Photography and Video Production Tips and Techniques. Take your craft to the next level. Operated by Hurricane Images Inc. www.HurricaneImagesInc.com
POWERFUL INTIMATE VIDEOGRAPHY / PHOTOGRAPHY | www.hurricaneimagesinc.com
Showing posts with label models. Show all posts
Wednesday, May 18, 2016
Nailing Perfect Exposure in Lightroom
I'll be the first to admit that I have a problem nailing the perfect exposure for the final print, especially if that print is on paper. Personally, I tend towards moodier images with more dark tones. Computer monitors generate light, so images usually appear brighter on screen than when printed. Combine my "mood" with physics of light and you can end up with seriously unhappy client.
Almost all non-professional printers (like those at Walgreens) auto adjust the exposure because of this. So in many cases you're saved by technology. But professional printers often don't (it's a mixed bag), and it's always better to be in control of your own exposure.
The rule of thumb I sometimes hear is to find the exposure you like, and then increase it between 1/4 and 1/2 stops when sending to the printer. That's a good rule of thumb, but I think I've found a more precise way to ensure the skin tone in my portraits are properly exposed. If we follow the Zone System, we know that skin tones should be between Zones 5 and 7 (depending on skin color). I've always been annoyed that the histogram in Lightroom doesn't change when you zoom in, but it does change when you crop the image. So to perfectly expose skin you simply need to crop in:
Then adjust your exposure watching the histogram. The histogram is divided into four sections. Perfect skin tones will reside between the mid point (Zone 5) and the third line (essentially Zone 7).
You can adjust the exposure while still in the Crop Mode, and then re-crop the images to taste.
Now for a quick tip: while in the Develop Module, when you put your cursor over an area the histogram doesn't change, but the numbers below R, G, & B, will show their values. You can quickly check the exposure by hovering your mouse over the area.
Monday, April 27, 2015
Balancing Uneven Couples
As portrait photographers we're always working with an ideal of beauty on some level or another. In life, these standards of beauty can be oppressive, damaging, but even the most independent and rebellious person tends to have at least one part of their body that bothers them because it doesn't fit that ideal. Weight is one of the most common, and while every intelligent person knows it doesn't define beauty, most people would rather not see their weight "issue" immortalized on film. And this is true whether their weight issue is real or not. Couples can see beyond to the real beauty of a person, but when two people are pictured together, their difference in size can become even more obvious.
There are a number of techniques to "balance" a couple on film. Generally speaking, each person should take up about the same amount of space in an image. Culturally, we can see the man as a little bigger, but surprisingly they don't look any less masculine when equalized or balanced. And if the man is a lot bigger than the woman, it can be equally distressing for them.
In standard V pose, couples of roughly equal size photograph "well." It looks like this:
If the man is heavy set, you can have them face the camera and slide the woman in front so she covers part of his body. This way, their space is about equal. To keep her from becoming boxy, you have to put her weight on one foot, cock the hip, and work on the curves.
(You could have her face the camera directly and him angled towards her-- and this can work well for a certain feel-- but now he's in the feminine pose and she is in a more masculine pose.)
If she is larger than him, he can face the camera directly and she can slip her arm through his, placing her shoulder behind his.
Remember, the idea is to have them take up nearly equal space in the frame.
Recently, I photographed a couple who's height difference was 1.5 feet. We played with her on a curb and him below, and sitting in various positions. Her in his lap but their eyes level. One thing you never want to do his have him slouch-- that'll ruin a picture.
There are a number of techniques to "balance" a couple on film. Generally speaking, each person should take up about the same amount of space in an image. Culturally, we can see the man as a little bigger, but surprisingly they don't look any less masculine when equalized or balanced. And if the man is a lot bigger than the woman, it can be equally distressing for them.
In standard V pose, couples of roughly equal size photograph "well." It looks like this:
If the man is heavy set, you can have them face the camera and slide the woman in front so she covers part of his body. This way, their space is about equal. To keep her from becoming boxy, you have to put her weight on one foot, cock the hip, and work on the curves.
(You could have her face the camera directly and him angled towards her-- and this can work well for a certain feel-- but now he's in the feminine pose and she is in a more masculine pose.)
If she is larger than him, he can face the camera directly and she can slip her arm through his, placing her shoulder behind his.
Remember, the idea is to have them take up nearly equal space in the frame.
Recently, I photographed a couple who's height difference was 1.5 feet. We played with her on a curb and him below, and sitting in various positions. Her in his lap but their eyes level. One thing you never want to do his have him slouch-- that'll ruin a picture.
Wednesday, August 20, 2014
Underground Runway Summer Issue is Out!
During this past year I've done a couple of shoots with the talented and motivated folks at Underground Runway, an Oakland-based fashion company. They've published their summer guide and you can check it out online here. Images from my two shoots with them are sprinkled throughout, a nice honor.
Our session started with rain threatening, an overcast sky and you can see the effects of the light on the above image. Her skin was light enough that I didn't feel inclined to pull out a reflector, though it might have helped. Later, the sun emerged and out it came. The designer said she'd never seen a photographer switch out the reflector surface, which prompted my blog post here.
Fashion photography is one of our specialties at Hurricane Images Inc. It's such a joy working with clothing designers and make-up artists-- it lifts your work to another level that's hard to reach otherwise.
Sunday, January 26, 2014
Day 14, Learning 14: Er... squinching?
Hmm. Okay. If you're aiming for "cool" in your portraiture this Peter Hurley technique has (I'm embarrassed to say) about a 70% success rate in adding something. It's Peter's new "thing," and he's been stumping it campaign style for the past month. If you haven't heard about it yet, it goes like this:
You can add a bit of Hollywood cool or sultry to your look by squinting slightly. It's really a half-squint: in a full squint you tighten both the top and bottom of your eyelid and it naturally pulls in on the side. Do this in a photo and you're likely to be mistaken for a perv. Squinching is really when you slightly tighten the lower eyelid. This works best when the subject is looking directly at the camera. Takes a bit of practice to know what you're going for, so grab a mirror. Or check out this video.
I'm going to point out one of the major drawbacks of this technique which may get me flamed. It makes everyone's expression exactly the same; it has no real personality, only faux personality. That doesn't mean squinching doesn't belong in your bag of tricks or photo session. After all, everyone feels anger, or detachment, or sexy from time to time-- this is a shortcut for conveying those emotions. It's shortcoming is a woman may squinch at you when she's feeling sexy, but she's probably doing other things as well to convey how she's feeling, things that create a unique dimension to her personality. Those things are lost in a shortcut. But it's worth playing around with in a photo session, because sometimes manifesting something externally leads to its authentic emotion internally. Being a theatre director these are familiar techniques; perhaps I'll write a post about directing, acting, and posing....
Tuesday, January 21, 2014
Day Nine, Learning Nine: Posing hands
Learning, I’m finding, tends to go in trends. From yesterday’s exploration of posing the
body, I’m going further to working specifically with hands. Hands often look awkward on camera; they’re
very complicated limbs. So here are some
more tips for working with models:
1. As before, keep
the hand and wrist relaxed (can’t emphasize that enough)
2. Have them do something: adjusting rings, bracelets, watches; twirling
hair
3. Remember to create gaps with your hands as well. Let us see through them
4. For women, keep the pinky side closest to the
camera. Never face the back of the hand
towards the camera
5. When hands are one hips, lift the palm up so that its
cupped; don’t let it sustain weight
6. Fingers on a hand should all point in the same basic
direction. Don’t “splay” them out
7. When hands are at the face, avoid actually touching. It smears make-up and creates indentation
shadows
8. And finally, when
in doubt, lift the forefinger like in ballet
Monday, January 20, 2014
Day Eight, Learning Eight: 17 Tips for posing models
Remember when I wrote that one of the four areas of expertise was "the subject?" For most photographers that subject is a human being. In working with people, there are really two considerations: how to position physically, and how to position them in relation to the light. Today's learning consists of 17 Tips for posing a model or client physically. These points are adapted from Roberto Valenzuela
presentation. He’s a superb wedding
photographer and you can find a Youtube video of him talking about his points
here:
1. Keep the spine straight-- no slouching!
2. Create as many
angles with the arms and legs a possible for a natural pose, but avoid 90
degree angles unless the arm is resting on a surface. 90 degrees looks unnatural.
3. Give the hands something to do: hold an object,
perform an action, tuck them into pockets, etc.
4. Keep the hands and
fingers relaxed and soft.
5. The origin of the fingers must always be visible (never
have fingers peeping around a waist or over the shoulder). If possible, make the whole hand and wrist
visible.
6. Shift the body weight onto one leg for a more relaxed
look. If you want something more formal,
put the weight equally on both feet.
7. Avoid mirroring the arms and feet. Place one hand higher than the other, or the
arm bent at a different angle.
8. Avoid pointing the
collar bone directly towards the camera.
Angle it away and turn the chin back towards the lens. This is a guideline, not a rule. Point the collar bone directly at the camera
can be quite powerful, though less elegant and refined.
9. The eyes should be
the first thing the viewer sees. There
should be a direct line of focus towards them.
10. Create gaps. Let space be visible between the arm and the body. If leaning against a wall, create a gap
between the body and the wall (so that only the shoulder is touching the wall).
11. With couples, it’s safest to keep their bodies visible
in equal ratios. Don’t have either
couple take up twice as much of the image as the other. Angle the larger body, or “tuck” it behind
the body of the other person so they are closer to being balanced.
12. Avoid having
their noses pointed in the same direction (two profile faces, for
example). Instead, have them pointed
slightly towards each other.
13. Create points of
touch. The more places or points a
couple touches (hands, foreheads, hand to cheek, etc.), the more intimate the
image.
14. Pose the
eyes. Tell them where to look. Work with the eyes last (position their
bodies first).
15. Be specific in
your direction. It doesn’t matter if
you’re working with a professional model or a “normal” Joe, people want
direction and feedback. Tell them "lift your chin, tilt your head back, and look at that tree."
16. Don't just tell them, show them. Have them mirror your body, or use your hand to show the angle, point in the direction, etc. Language is confusing and the last thing you need is a picture of a confused model. But don't be afraid to verbalize what you're doing as well.
17. After you have
the pose set up, inject emotion into it.
Tell them to imagine such and such, make them laugh, etc.
Now let's take a look at the image in this post and compare it to the rules:
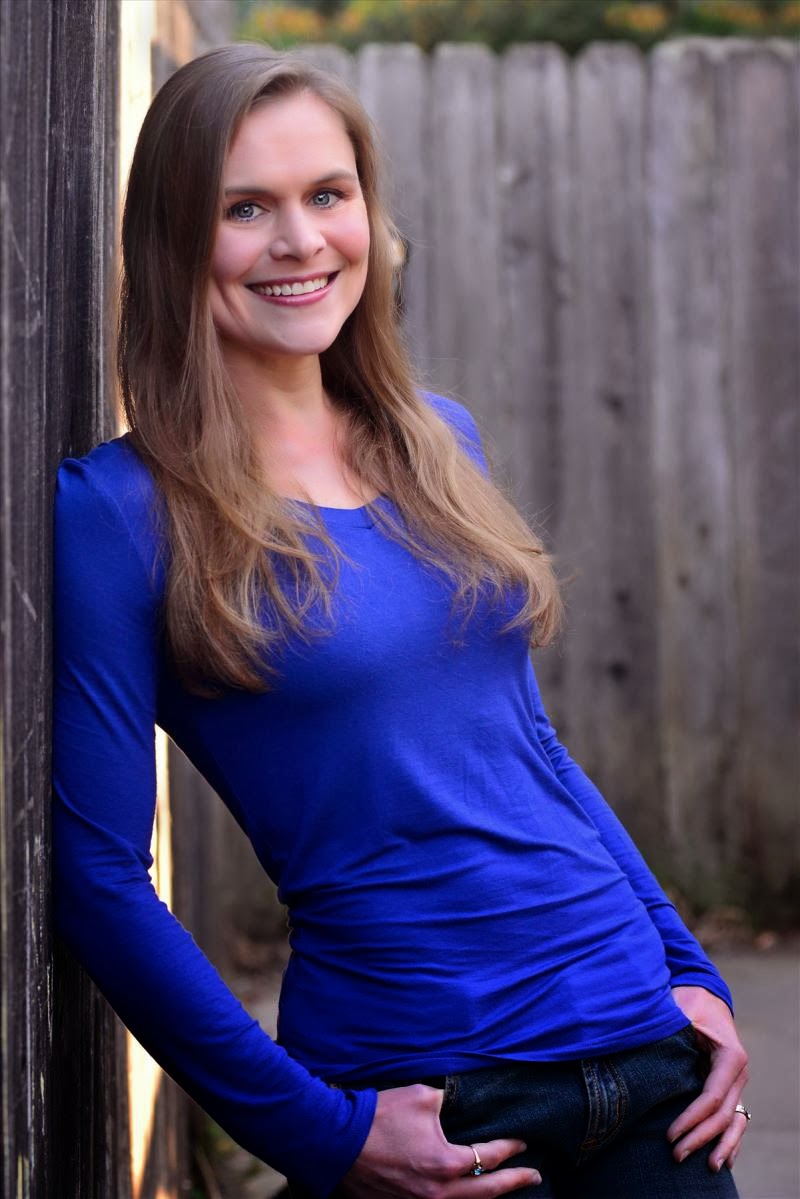
Spine straight, bent arms, no 90 degree angles, hands tucked, no amputated fingers, weight on one leg, collar bone pointed away from the camera, gaps beaten the wall and her body, eyes posed. Is it perfect? Well, I should have noticed the wrinkles on her shirt for one....
Subscribe to:
Posts (Atom)


