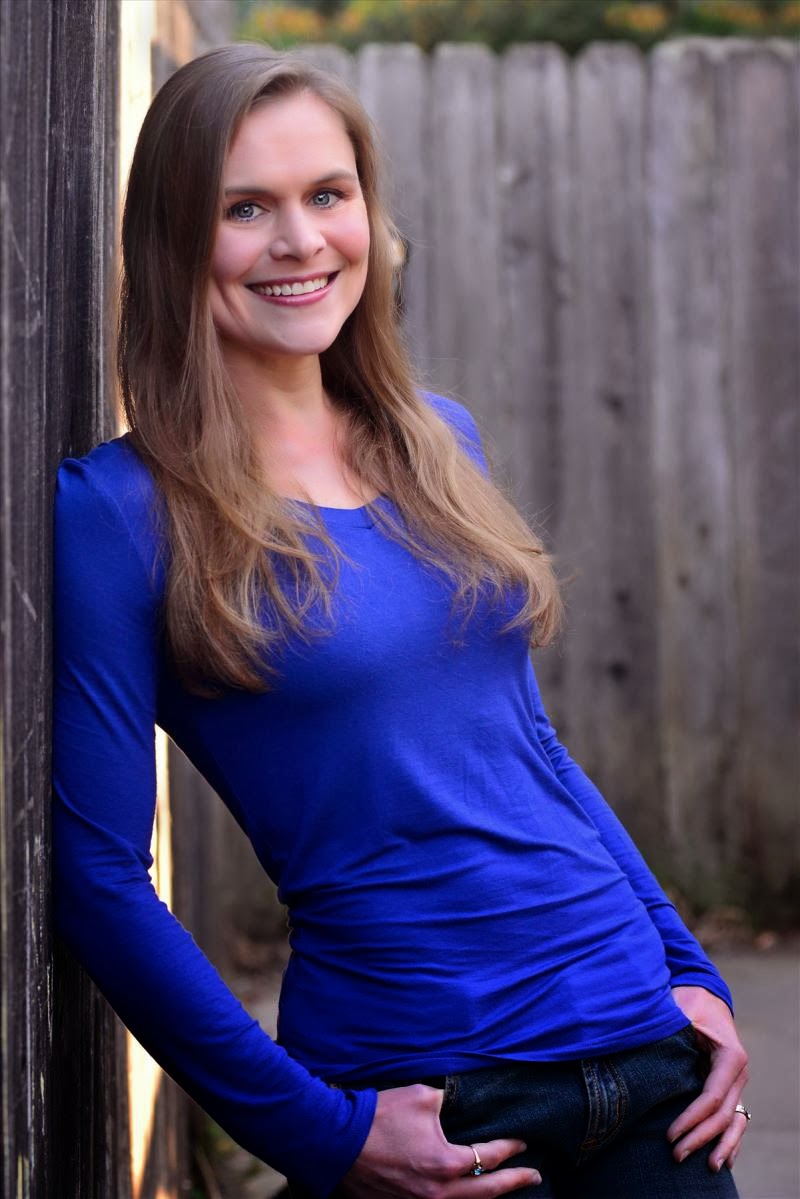
Remember when I wrote that one of the four areas of expertise was "the subject?" For most photographers that subject is a human being. In working with people, there are really two considerations: how to position physically, and how to position them in relation to the light. Today's learning consists of 17 Tips for posing a model or client physically. These points are adapted from Roberto Valenzuela
presentation. He’s a superb wedding
photographer and you can find a Youtube video of him talking about his points
here:
1. Keep the spine straight-- no slouching!
2. Create as many
angles with the arms and legs a possible for a natural pose, but avoid 90
degree angles unless the arm is resting on a surface. 90 degrees looks unnatural.
3. Give the hands something to do: hold an object,
perform an action, tuck them into pockets, etc.
4. Keep the hands and
fingers relaxed and soft.
5. The origin of the fingers must always be visible (never
have fingers peeping around a waist or over the shoulder). If possible, make the whole hand and wrist
visible.
6. Shift the body weight onto one leg for a more relaxed
look. If you want something more formal,
put the weight equally on both feet.
7. Avoid mirroring the arms and feet. Place one hand higher than the other, or the
arm bent at a different angle.
8. Avoid pointing the
collar bone directly towards the camera.
Angle it away and turn the chin back towards the lens. This is a guideline, not a rule. Point the collar bone directly at the camera
can be quite powerful, though less elegant and refined.
9. The eyes should be
the first thing the viewer sees. There
should be a direct line of focus towards them.
10. Create gaps. Let space be visible between the arm and the body. If leaning against a wall, create a gap
between the body and the wall (so that only the shoulder is touching the wall).
11. With couples, it’s safest to keep their bodies visible
in equal ratios. Don’t have either
couple take up twice as much of the image as the other. Angle the larger body, or “tuck” it behind
the body of the other person so they are closer to being balanced.
12. Avoid having
their noses pointed in the same direction (two profile faces, for
example). Instead, have them pointed
slightly towards each other.
13. Create points of
touch. The more places or points a
couple touches (hands, foreheads, hand to cheek, etc.), the more intimate the
image.
14. Pose the
eyes. Tell them where to look. Work with the eyes last (position their
bodies first).
15. Be specific in
your direction. It doesn’t matter if
you’re working with a professional model or a “normal” Joe, people want
direction and feedback. Tell them "lift your chin, tilt your head back, and look at that tree."
16. Don't just tell them, show them. Have them mirror your body, or use your hand to show the angle, point in the direction, etc. Language is confusing and the last thing you need is a picture of a confused model. But don't be afraid to verbalize what you're doing as well.
17. After you have
the pose set up, inject emotion into it.
Tell them to imagine such and such, make them laugh, etc.
Now let's take a look at the image in this post and compare it to the rules:

Spine straight, bent arms, no 90 degree angles, hands tucked, no amputated fingers, weight on one leg, collar bone pointed away from the camera, gaps beaten the wall and her body, eyes posed. Is it perfect? Well, I should have noticed the wrinkles on her shirt for one....
No comments:
Post a Comment