PHOTOGRAPHY TIPS AND TUTORIALS FROM HURRICANE IMAGES INC.
POWERFUL INTIMATE VIDEOGRAPHY / PHOTOGRAPHY | www.hurricaneimagesinc.com

Monday, April 28, 2014

Day 65, Learning 65: Tips for Coaching Models


Posing models is one school of expertise and I wrote a little about it here, here, and here.  What I'm writing about today is talking to models during a session.  This is especially important because the sage advice to never touch a model is very very true... even if there's a little bit of over-simplification involved.  Directing and coaching blur together, but they are two different things.  If you want your model positioned a certain way, you direct; if you want to bring out a particular emotion, you have to coach.

The first and most useful technique is to physically show the model what position you'd like them to be in by mirroring it.  This is not only quick, it makes them feel less self-conscious because you're doing it, too.  This includes both taking the same position and things like pointing in the direction.  Don't be afraid to put the camera down to show them what you want.

Because you're facing each other, your left is there right.  With practice you can also learn to give verbal directions by reversing everything.  So it's possible to say, "shift your weight onto your left foot."  If the direction is simple, they'll get it. Something else I occasionally do is turn around and look at the world from their perspective.  That way I can say, "look at that tree...."  

Coaching
These are the basics for finding the right poses and positions.  Now comes making your model relaxed and emotive.  It's hard to be on the other side of the lens, taking chances with poses that might make you look ridiculous (and be immortalized forever on film).  This is especially true if the photographer is silent.

Be specific with your models:
  • Soft smile / Big smile / Smile with your eyes / Don't smile
  • Part your lips a little
  • Raise/lower your chin
  • Look towards/away from me/down and to your left

Encourage to your models:
  • That's good/great
  • Nice, Excellent
  • Beautiful
  • You look great
  • Just like that
  • A little more
Warm them up:
  • Shake it out
  • Wiggle something
  • Make a pucker face
  • Make it a gesture-- run your fingers through your hair
Create emotion:
  • Think of: your favorite part of your partner/ your favorite dessert
  • Remember lying out on a sunny day/watching the rain fall

There are endless scenarios for creating emotion.  Consider them before the shoot and choose the ones that match your client or the emotive quality your creating.  When shooting for a theatrical production (such as the image above) I often have them pick a line from that moment and repeat it over and over again.  With inexperienced models, having them do a gesture that ends in the pose you want can appear more natural than having them hold the pose.  In theatre, I often combined both those techniques.

Friday, April 25, 2014

Day 64, Learning 64: Get Your Game Face


This past weekend I was reminded of an experience that motivated me into becoming a professional.  The difference this time around is that I was on the other end of the dynamic.  Dear friends had asked me to "bring my camera" for a special event they were having.  It was, truly, as special event so I didn't mind the request.  Before things got rolling another friend of theirs showed up with a nice-looking camera, and I suspect he had brought it of his own accord.  He recognized the importance of the event and thought he should make sure it was documented.  When I pulled out my camera and started shooting, he put his away. 

I immediately flashed back to an experience from three years ago.  I was traveling in India with Chuck Fryberger, and exceptional videographer and photographer.  We were at a Theyyam-- an ancient and private ritual that exists in only one small part of India and the world.  It's a day-long ceremony, and as evening fell I found myself standing behind an older Indian man.  He was shirtless, and his arms were crossed so that his hand rested on his shoulder.  It was the most fascinating hand I had ever seen, gnarled and slightly disfigured by life.  Framed against the background of a glowing fire and throng of people it was a beautiful shot; but I thought it was too personal. The hand spoke volumes about him-- but also about me... my cultural and economic difference.  While I gazed at it like an imbecile, Chuck wedged himself between us and took the shot.  I could see the LCD on the back of his camera and it was just as beautiful as I imaged (and he took it beautifully, with elegance and assurance).

It was right then that I realized the difference between Chuck and I.  He was a photographer, a professional.  He was committed to the image; his sense of self, his pride was all that.  I didn't see myself as a professional three years ago.  I took beautiful photographs.  But there's a difference.  A game face.

Last weekend I saw the same situation mirrored in reverse.  The other photographer, who may have been as skilled or more than I, didn't see himself as a photographer.  We chatted for a while about the event and photography, and after a little while he pulled out his camera and started shooting as well.

My advice to people starting out today is that when you pick up the camera, commit yourself as a professional.  This doesn't mean you're insensitive to personal privacy, pushy, or arrogant.  It means that no matter how badly things are going with a shoot or who else is there, you are committed and driven.

What does that mean in actionable terms?
1. Come prepared.
2. Use your natural "authority" as a photographer but don't push boundaries.
3. When you miss a shot, ask to do it over if you can.  Talk to your subjects/clients.
4. No matter how prepared you are, problems arise. They chose a professional to deal with those problems.  Work the scene.

Monday, April 21, 2014

Day 63, Learning 63: Extreme Macro


For the second half of my 100 Days/100 Learnings posts, I've decided to continue at a most relaxed pace.  Life is just too crazy-full-unpredictable to break one's back over daily entries-- but I want to keep the posts coming.  And hopefully keep them informative and helpful.

Today's post is a little bit of equipment.  I don't talk about gear much on this blog (I believe that the emphasis on the quality and amount of one's equipment is more often a hindrance than a help); but I  had the good fortune to pick up a Nikon 35-70mm F/2.8 a few years ago.  This older piece of glass has exceptional sharpness and is half the price of its younger sibling, the 24-70mm f/2.8.  At the time I worried I wouldn't use it because of the rather "un-dramatic" range-- neither wide nor close-up-- but on the contrary it's become my walk-around lens.  It also has macro capability, which has come in useful.

But I'm not writing about the lens, today, but rather teleconverters.  Teleconverters come in different types or "powers", typically between 1.5x to 3x.  The number refers to the magnification.  Typically, we turn to a teleconverter in order to magnify the reach-- turning a 200mm into a 400m lens, for example.  But they can also increase one's "macro" ability, getting even closer to the subject for an extreme close-up.  The picture above was shot four inches from the subject with no cropping to the final image.

A couple of things to remember, though, before running out and purchasing one:  first, like anything you put in front of your lens, quality is important.  There's little point in magnifying softness.  Second, the magnification amount corresponds directly to the loss of light in stops.  So a 2x teleconverter will cost you two stops of light, turning your f/2.8 into a f/5.6.  And finally, some teleconverters are manual focus only; you'll pay more to keep electronic control of your lens.

Thursday, April 17, 2014

Day 62, Learning 62: Your Reflector is About Everything


I told you about the #1 Best Tool you can buy which can dramatically improve your photography skills; and the #2 Best Tool you can buy (also for self-improvement but with an added bonus of being useful for things like being your own second shooter and night photography).  Now I'm going to introduce the third best tool you can own besides your camera: a collapsible reflector.

Right about now you're thinking you should skip this entry and read something more intelligent-- hey, I surprised myself by deciding to write about this simple tool. But while on a shoot the other day the fashion designer said she'd never seen a photographer reverse the cover of the reflector before.  None of the photographers she worked with paid any attention to the color and intensity of the reflected light. So I guess someone needs to champion this remarkably simple tool.

There are actually six different uses for a 5-in-1 reflector.  I have two of them (a 32" and a 60") and this $15-$30 dollar tool is capable of mimicking almost any light modifier under $200.

The Black Side:  This is for subtracting/blocking light.  On a bright overcast day you can place it to one side of your subject to create a subtle shadow or fill side for their face.  You can also use it as a flag to block light from a flash or other light source.  And at 60" it can function as a black backdrop for a head shot..

The Silver Side:  This is for reflecting light back at the subject to remove shadows.  Being silver, it produces almost a 1 to 1 ratio of light, reflecting about 90% of the light it catches.  This also makes it a great tool for bouncing your flash back at your subject: the Silver Side (and the White as well) can function as a portable wall in open spaces.  It's the most powerful reflecting surface, and with power comes some limitations.  One a bright sunny day it may be too bright, blinding your model and flattening the scene.  That's one reason why people will choose....

The White Side:  This is a softer reflection.  It loses about 2 stops of light in the bounce, which can make for a great fill if positioned close enough.  It's also easier to control and softer than the silver.

The Gold Side:  The gold side tends to be in between the white and silver in terms of light intensity. It also has a warm glow that can be quite beautiful on some skin tones and in low-key photography.  You have to be careful, though, because on other skin tones it can look yellow.

The Translucent Disc:  This is the most neglected tool your reflector has, and one of the most versatile.  With a 60" reflector, the semi-transparent material can create a patch of mobile shade for taking pictures outside in bright sun.  You no longer need a tree for shade (but you do need an assistant).

The Translucent Disc:  The 6th function of the 5-in-1 reflector is utilizing the semi-transparent disc as a shoot-through scrim.  When the light from your strobe hits the surface it spreads out, creating a large, soft light source.  While there are professional-grade scrims of different density and quality that can produce a better quality of light, your humble reflector is surprisingly good.  See the image below and judge for yourself.


One of the remarkable things about this simple set-up is how even the light is from waist to forehead using a 32" reflector in the simplest flash set-up imaginable.  The best thing is that it works equally well with a 60" reflector and a single strobe, producing an even light from head to toe.

Friday, April 11, 2014

Day 61, Learning 61: Perfecting Black and White


Whoa! that was a long break.  Sorry, didn't mean for that to happen.  The break was precipitated in part by three shooting sessions (spanning four days) in eight days.  A ton of post processing involved.  But never fear, I did not interrupt my 100 days of learning, only my 100 days of posting.

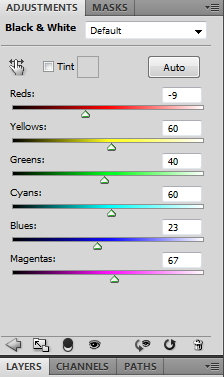
Today's learning is a favorite technique I developed.  For years I struggled with why my black and white conversions were so blah.  Adjusting the color sliders in Photoshop helped immensely, but my images still didn't seem to reach anywhere near the quality I wanted.  This is still a work in progress, but I made significant advances by applying the black and white filter in layers rather than globally.

First, I found it's best to make my conversion in Photoshop and not Lightroom.

Here's what my image looked like with a flat conversion, no adjustments.

It's not terrible because there's lots of contrast and variation in saturation in the original color image.  But compare the skirt, shoes, and face with the top image.  The skirt is washed out, the shoes crushed into darkness, and the skin has less of a glow.

Here's how I improved it:  I applied the B&W filter and adjust just for her skirt.  Then I reversed the mask to black (Ctrl-Backspace) and painted in the skirt.  Once you've painted an area into B&W it will not be affected by subsequent conversions.


Then I recreated a separate B&W adjustment layer for her shoes and brightened the blue; and a separate B&W layer for her lips; and a final one for her face.  I could have done the background as a separate layer, too.  Zoom in and out of the image to make sure each adjustment layer achieved exactly the tonal contrast you want.


You don't need to worry about painting each layer too precisely.  It's all being converted to black and white, so little overlaps are invisible.

Bonus step:  I added a little lens blur to the final (top) image... just on the top right corner and the bottom edge.  It gives a slightly dreamy quality to the image that's difficult to define.