Whoa! that was a long break. Sorry, didn't mean for that to happen. The break was precipitated in part by three shooting sessions (spanning four days) in eight days. A ton of post processing involved. But never fear, I did not interrupt my 100 days of learning, only my 100 days of posting.
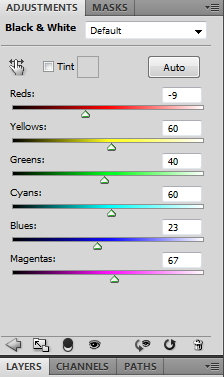
Today's learning is a favorite technique I developed. For years I struggled with why my black and white conversions were so blah. Adjusting the color sliders in Photoshop helped immensely, but my images still didn't seem to reach anywhere near the quality I wanted. This is still a work in progress, but I made significant advances by applying the black and white filter in layers rather than globally.
First, I found it's best to make my conversion in Photoshop and not Lightroom.
Here's what my image looked like with a flat conversion, no adjustments.
It's not terrible because there's lots of contrast and variation in saturation in the original color image. But compare the skirt, shoes, and face with the top image. The skirt is washed out, the shoes crushed into darkness, and the skin has less of a glow.
Here's how I improved it: I applied the B&W filter and adjust just for her skirt. Then I reversed the mask to black (Ctrl-Backspace) and painted in the skirt. Once you've painted an area into B&W it will not be affected by subsequent conversions.

You don't need to worry about painting each layer too precisely. It's all being converted to black and white, so little overlaps are invisible.
Bonus step: I added a little lens blur to the final (top) image... just on the top right corner and the bottom edge. It gives a slightly dreamy quality to the image that's difficult to define.


No comments:
Post a Comment